Welcome to Week 4 of our Bohemian Glam office renovation with the One Room Challenge. If you are new here, make sure to catch up on the last three weeks to see what the inspiration and mood board for this space looks like (Week 1), this space looked like before (Week 2) and some progress updates (Week 3).
After a REALLY long week of hard work on these pieces, I’m THRILLED to share with you our new credenza and chairs for the office space! Phew! My arms are still burning from all the stripping, sanding, painting, waxing, cleaning and reupholstering that went into these pieces!
Every single time I take on a furniture flip, I always seem to go through the EXACT same emotional roller coaster: it starts with the thrill and excitement of trying to find the perfectly unique piece that someone is getting rid of at a steal of a price. Then comes the actual hard work and it almost ALWAYS takes way more time and effort than I remember and that’s where the doubt, loathing and the promises to myself that I’ll NEVER refinish another piece of furniture come in. Finally, after all that hard work, comes the incredibly rewarding pay-off – when you get to set up and style the piece in your space and give yourself the biggest pat on the back for knocking it out of the PARK! Sound familiar to anyone who’s ever refinished furniture?! Just me?
I can’t stress enough how thrilled I am with how these pieces came out and a huge reason is because of the paint and wax I used. While I’ve worked with Valspar Canada many times before, it was always for wall, ceiling, outdoor or trim paint. I actually forgot that they had a chalk paint line, so when I remembered, I was thrilled that they had a collection of 40 tintable colours and that they wanted to work with me on this!
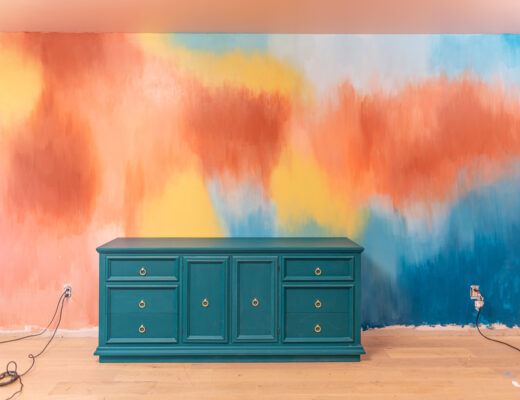
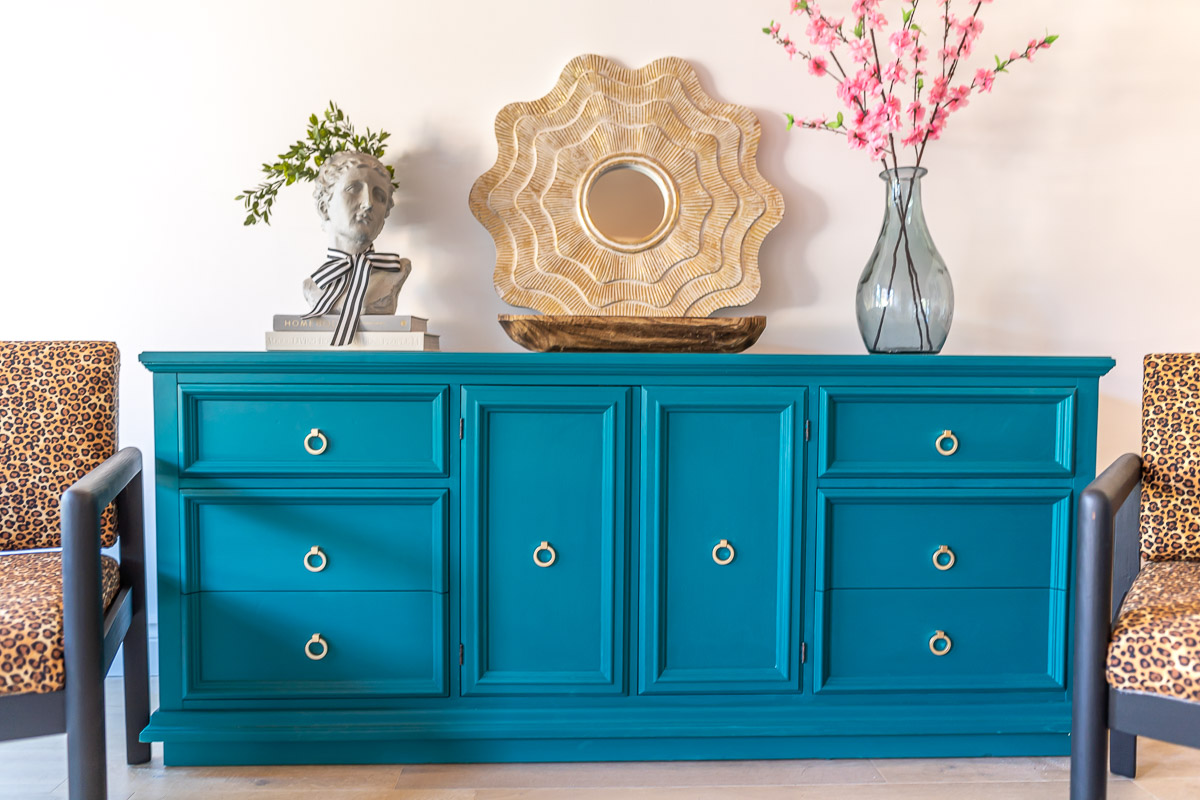
Let’s start with the credenza (or sideboard or buffet or server – whatever you want to call it, I’m okay with it). I found this at the ReStore for $75 right before the third lockdown. It was the nicest credenza in the store and made of real wood with almost zero damage to it. But it was in major need of a makeover. So we removed all the hardware as well as the two wooden appliques and then we decided to strip and sand it down. Now typically, when painting with chalk paint, you really don’t need to strip and sand, but I’ve found from my own experience of doing this many times, it’s ALWAYS a better outcome that allows for greater longevity of the piece when it’s sanded down in the beginning.

We struggled with finding paint stripper that would work and quickly realized that because this piece was SO massive, it was going to take forever to get it all ready for paint. But alas, I prevailed and it was finally time for chalk paint. We went with Valspar’s “Ann’s Embroidery”. It’s like this mix of blue and green – I wouldn’t quite call it turquoise cause it pulls more on the green side, although these pictures below make it look more bluey. But either way, it’s a GORGEOUS colour. As I was painting it on our driveway all week, I had many neighbours stop by and comment what a GORGEOUS colour it was.
I did end up doing three coats of the paint only because I wanted a really solid and bold colour. I was so impressed with Valspar’s Chalky Paint – it was like none I had ever used before. It went on like regular paint – ready to go from the can (no need to water it down). It was so smooth and not gritty like many other chalk paints I’ve used.
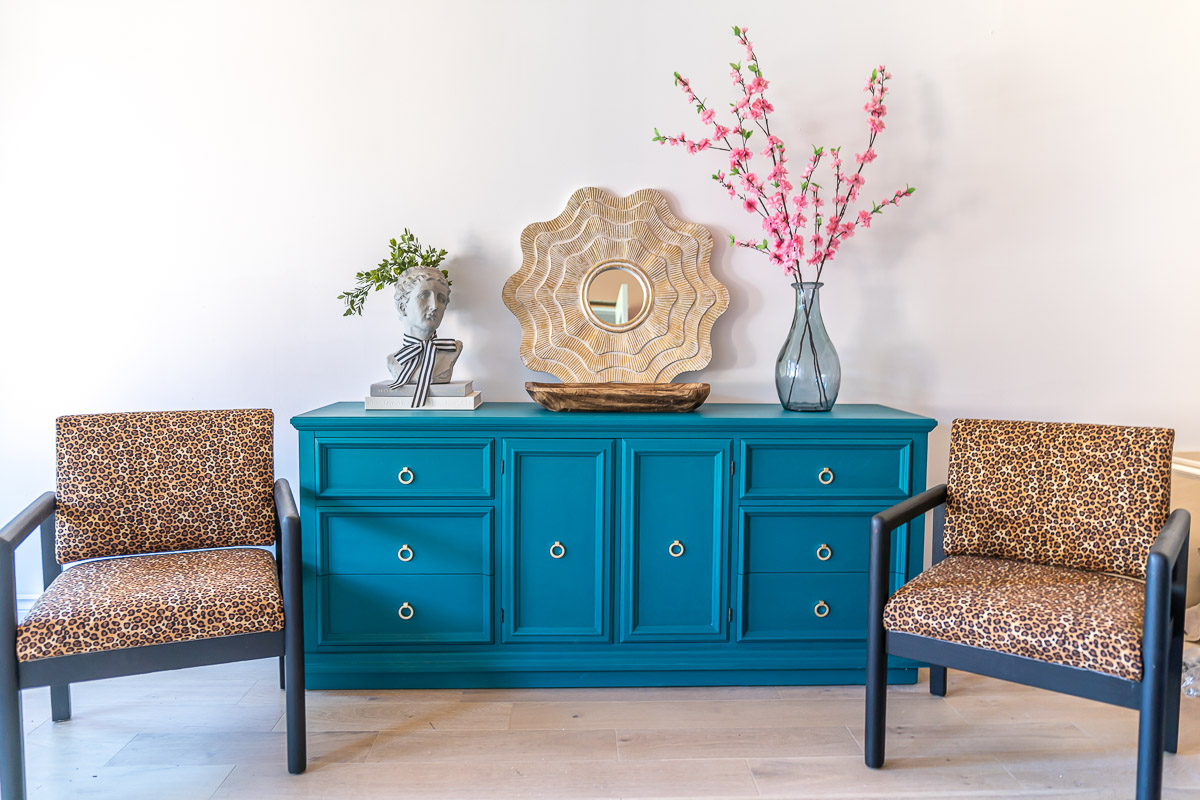
When it came to the wax, I will admit that I was a little surprised when I opened the can. It was unlike any other wax I’d used before – much more of a mod podge kind of substance. I was able to brush it on with a brush and then just wiped it down with a lint free cloth. The wax step is SO necessary when doing chalk paint – it completely transforms the colour and texture of the piece. We added in some gold hardware from Amazon which were so inexpensive (10 for $34) and I could not be more pleased with the look of it!
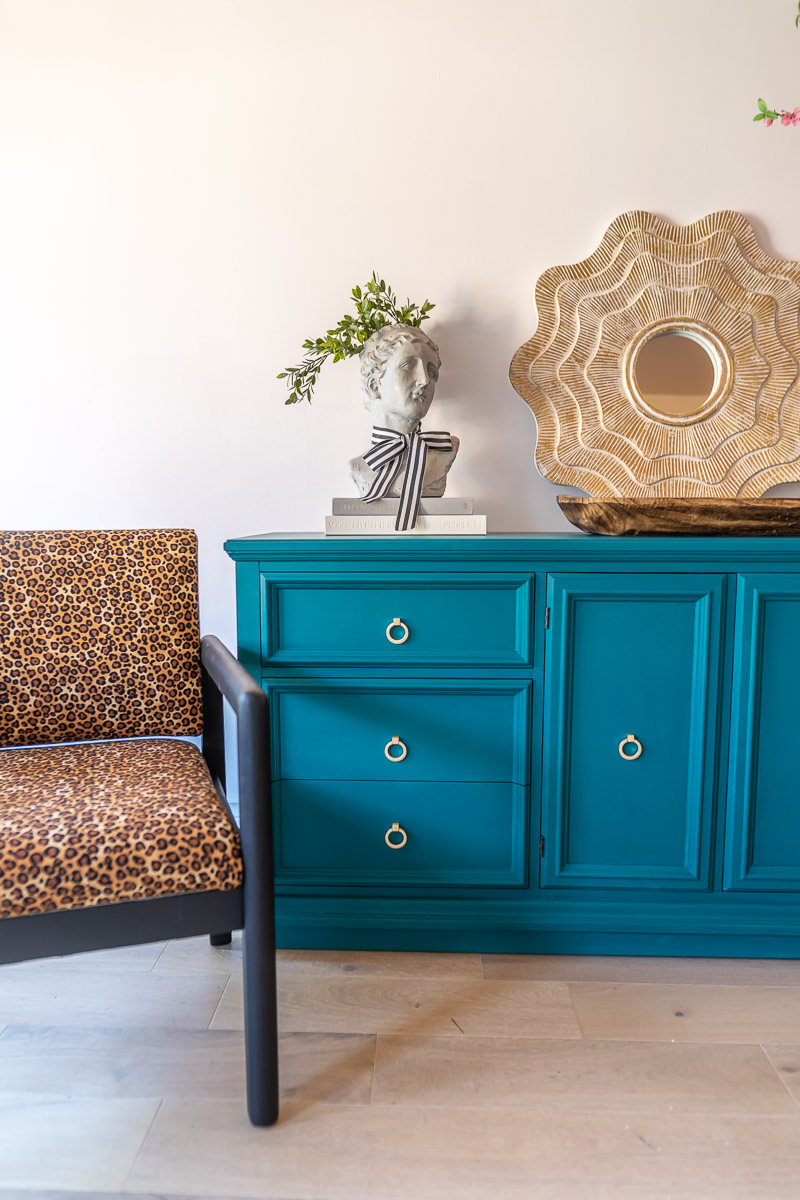
Next, we have these two chairs for the sitting area of the office. I was able to score these off of Facebook Marketplace for $30 for the pair! They were so ugly and in need of some TLC when I got them, so I knew I had my work cut out for me.
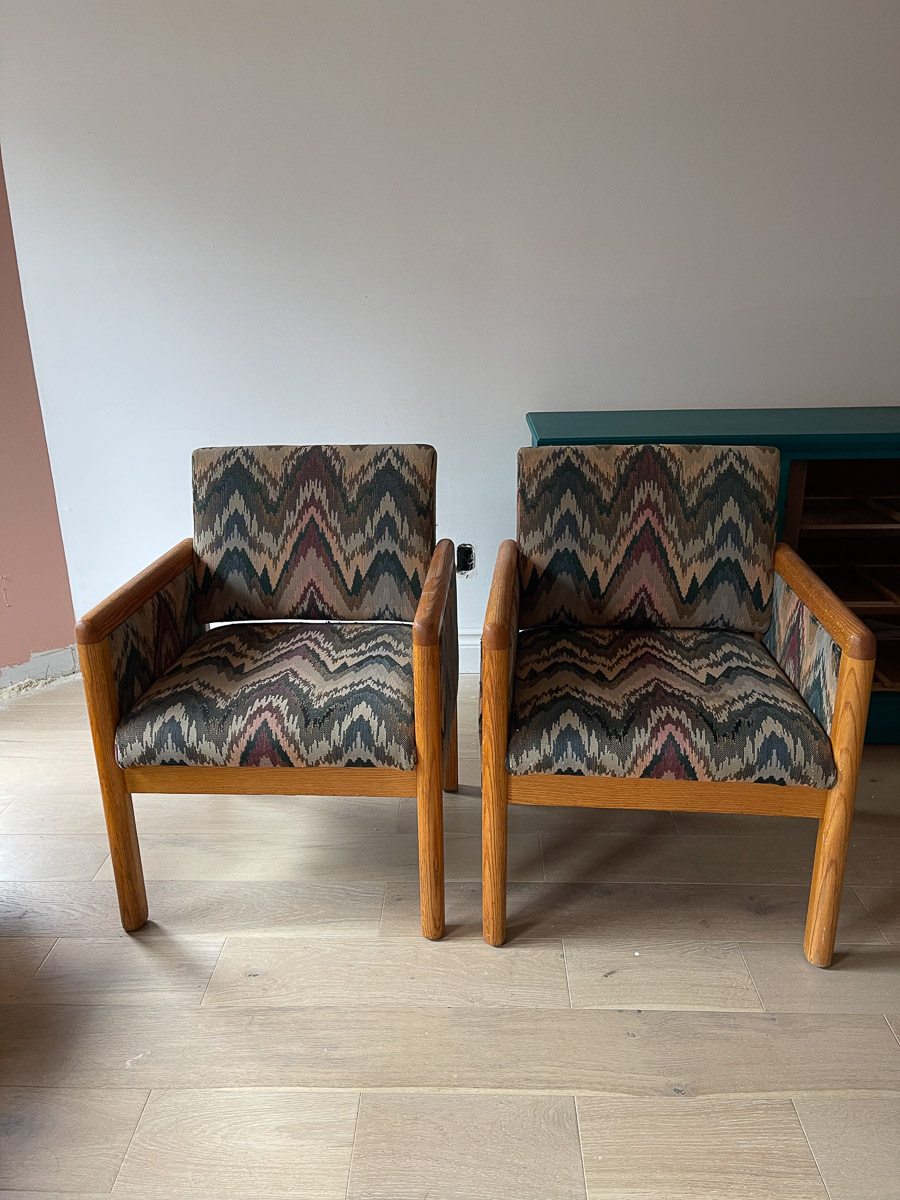
I got this crazy idea that I wanted to incorporate leopard print into the room in some way. I was inspired a couple years ago by my friend Jewel Marlowe from Jeweled Interiors when she redid some leopard chairs in her living room which are fabulous! I knew that if there was ever going to be a room that I could try to pull off leopard print chairs, this would be the one!

So I ordered some fabric online from Fabricville.com (because the fabric stores are still closed here in Ontario) and decided to take a chance! I took apart the entire chair and cleaned the cushions. I did lightly strip the varnish off of the chairs and then painted with Valspar’s “Boot Black.” For the reupholstery, I did it all without sewing – it’s just staples and a glue gun! I will be sharing a video on Instagram this week of how I did it, so make sure to follow over there to not miss it!
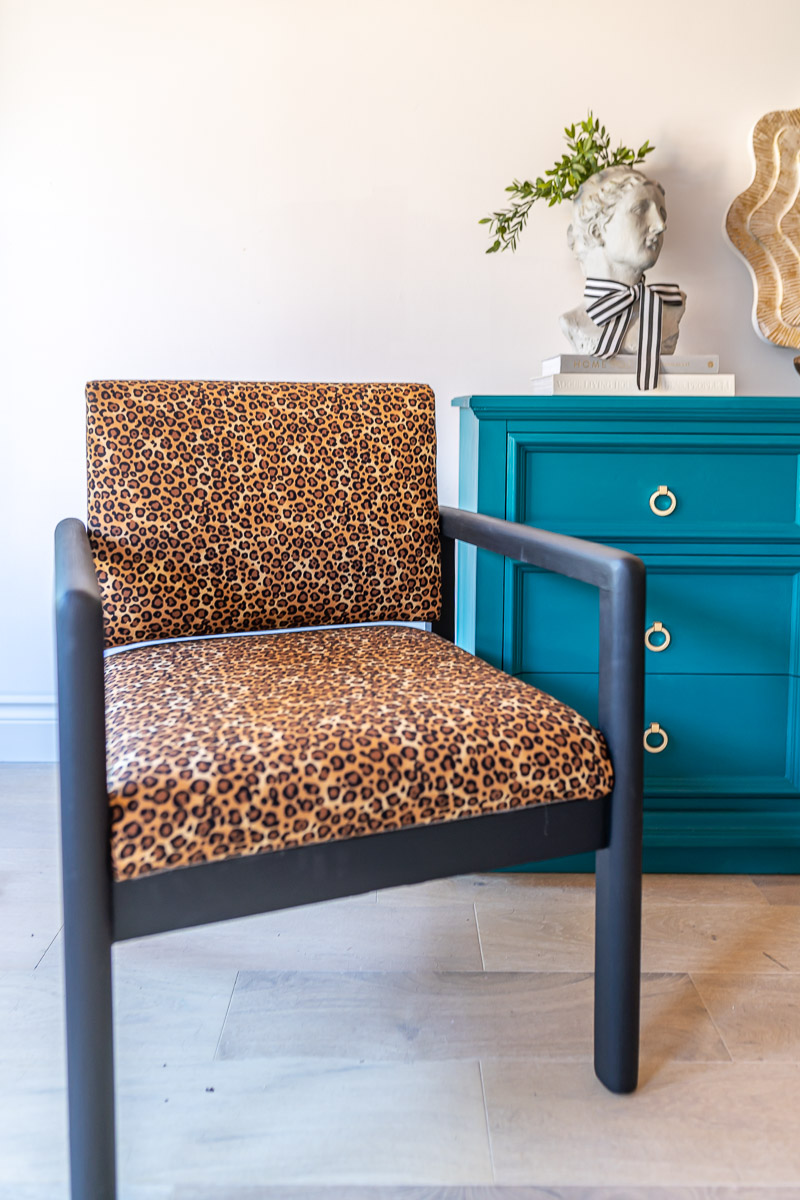
Overall, I couldn’t be more pleased with how these pieces turned out. Valspar’s Chalky Paint truly impressed me and I know I will be using it more for future projects (once my arms recover from this one). You can buy their paint at Lowe’s Home Improvement.
That’s it for this week friends! Make sure to come back next week for Week 5 – it’s going to be an incredible custom MURAL that I’ll be attempting and you won’t want to miss it!
Love & Blessings,
Christine