Welcome to Week 5 of our laundry/mudroom renovation! It’s hard to believe that this One Room Challenge is almost done. It’s been quite the journey and we want to thank you for following along and cheering us on as we’ve completely gutted and redesigned this space!
If you are new here this week, let’s catch you up before we dive into our update. Week 1 was all about the inspiration for the space as well as sharing those dreaded “before” photos! You can find the blog HERE on the Lowes.ca site and you can find the episode HERE on our YouTube channel. For Week 2, it was all about demolition. This is where the project went from a simple facelift to a complete gut job. Blog post HERE, video HERE. Week 3 we installed the new sink and faucet from Blanco Canada and showed you how easy it is to do yourself! Blog post HERE, video HERE. Last week, we shared our gorgeous new Twin Washer and Dryer dream team from LG Canada which includes a second washing machine! Total game changer! Blog post HERE, video HERE.
Well now that you are caught up, let’s get into Week 5 of our renovation!
This week we built our built-in cubby/hook/bench. I don’t really know what else to call it other than a mudroom built-in. It also seems like most of Pinterest doesn’t have an official word for it either because if you search mudroom built-in, you will find the same things that we built! I do think it would be wise to come up with a word for it, but I’m not going to be the one to name it! So mudroom built-in will do!

For years I’ve wanted a built-in space like this at one of the entrances into our home. Especially as the kids have grown bigger and they are now all in school, we need a place to catch all their stuff as they explode into the house after school. If you are a parent, you know exactly what I mean. It’s pure chaos after school and it only gets worse in winter with all the hats, gloves and snowsuits. Just stuff EVERYWHERE!
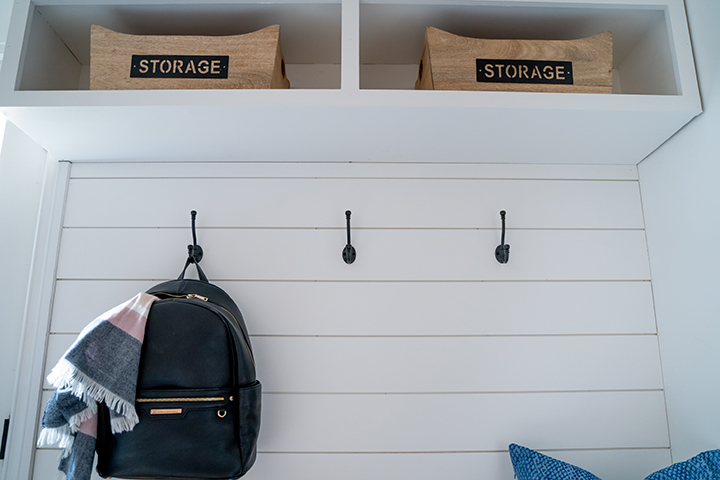
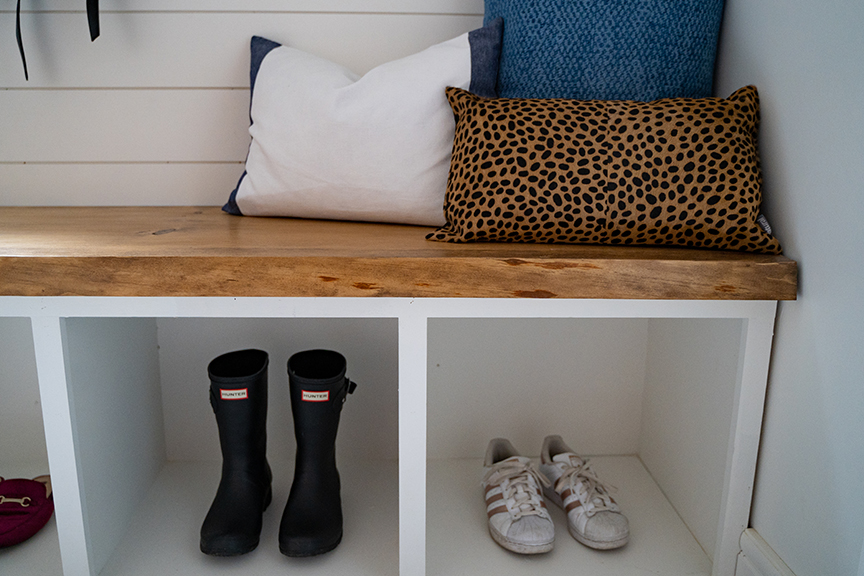
So we knew that we needed a space that would literally CATCH all of their stuff. Chris and I researched a lot online to figure out how to build a space like this that would best suit our needs. I knew I wanted the cubbies down below for their shoes/boots and then another cubby space above for their hats and mitts. I also wanted a cupboard space at the top for out of season items that we still wanted access to.
So Chris set out to build this custom space and I can honestly say, I’m SO impressed with how it turned out. A large part of why it ended up looking so custom was thanks to our friends over at Metrie, who is this week’s sponsor! I’ll be honest, I never gave much thought to trim and moulding before. But when you look at any custom designed room, it’s honestly the trim and mouldings that usually elevate the space and bring a look of completion. And that’s exactly what the Metrie trim and moulding did.
It was our first time ever using crown moulding and boy, is it ever beautiful! It was also our first time ever using shiplap! I finally decided it was time to jump on the shiplap bandwagon! I’ve always admired it but never had a place to really put it in our space. I never really had a place I wanted to do shiplap in the past, but as we were designing this laundry/mudroom, I knew that it would be the perfect application for the back wall of the built-in!
As Chris is the one who built this entire thing, I wanted him to describe exactly what he did, so he’s going to take it away here for a minute!
I started by making two sets of cubbies out of ¾” MDF. I installed one set on the floor and the other set on the wall, overhead. Above the top cubbies we also installed a set of pre-made kitchen cabinets for additional storage. On the bottom cubbies I added a bench made out of a slab of live edge white pine timber. At this point the whole thing looked really unfinished, but we had a plan… this is where Metrie came in. Between the bench and the top set of cubbies we had almost 4 feet of blank wall space. We thought this would be the perfect place to install Metrie’s pre-painted shiplap. This stuff is amazing! It is so simple to install, it looks great and because it’s already painted it requires almost no work to finish.
To make the top of the piece look truly “built-in” we used Metrie’s “French Curves” line of crown moulding. Crown moulding can be a bit intimidating but once you get the hang of it, it does an amazing job of finishing off a built in piece like this. In the end it was the shiplap and the crown moulding that really gave this project the look we were going for.
We also used Metrie baseboards and door casings. We chose a tall baseboard and it helps give the room a very high-end look! I’m super impressed with the lineup of products that Metrie offers. They have something for every project.
Well there you have it my friends, our custom made built-in that is perfect for a large and busy family!
Thanks for joining us on this week! Make sure to come back next week for the FINAL REVEAL! We are just so excited to share all the details with you!
Love & Blessings,
Christine

![]()